


 OPERATION DYNAMO: The BEF evacuation from Dunkirk
Dunkirk: The Movie and the Reality
Dunkirk, along with Pearl Harbor, D-Day and Hiroshima, is one of those WWII names that still resonate with most Americans 80 years later. If that weren’t already true, the release of a major Warner Brothers summer blockbuster by that name will rekindle memories of the May/June 1940 evacuation of the British Expeditionary Force (BEF) from France in the face of the Nazi blitzkrieg.
The new film is written, directed and produced by Christopher Nolan, who gave us “Interstellar,” “Inception” and “The Dark Knight” trilogy a few years back. It stars Tom Hardy, Jack Lowden and Fionn Whitehead in the principal roles; well-known actors Kenneth Branagh and Mark Rylance play supporting roles. Much of the film was shot on location in and around the city of Dunkirk.
“Dunkirk,” the second major film by that name, is scheduled for release on July 21 of this year in a hybrid IMAX 65mm format.
(So, would you like to know a little more of the actual story behind the Dunkirk evacuation of the BEF?) [So, we here at Battlefield Guides Online thought you might like to know a bit more of the actual story behind the BEF’s evacuation from Dunkirk.]
The film is not exactly commemorating a great military victory. Possibly Winston Churchill, the recently appointed British Prime Minister, characterized the evacuation most succinctly when he addressed the House of Commons on June 4, 1940: “We must be very careful not to assign to this deliverance the attributes of victory. Wars are not won by evacuations.”
Yet it was this “evacuation” of the BEF from the moles and beaches of the small French port of Dunkirk, heralded as a “miracle” at the time, that may well have saved the United Kingdom from the tread of the Nazi boot, the ramifications of which are sobering to contemplate. With the European democracies under Nazi control and the Japanese Empire flexing its muscle in China and the Far East, the United States would have found itself truly isolated in a hostile world. But, the British Empire and Commonwealth withstood the Nazi (and then the Italian Fascist) onslaught and that defiant stand began at Dunkirk.
The off-told story of how the mighty British Empire was almost brought to its knees at Dunkirk goes back at least 20 years to the ratification of the Treaty of Versailles, which ended the 1914-18 Great War with the German Empire. Resentment over the terms of the Treaty in Germany led to the collapse of the Weimar Republic and the rise of the National Socialist (Nazi) Party, founded by the charismatic Adolf Hitler.
After consolidating his power through intimidation and assassination, Hitler undertook a series of deliberate steps to order affairs in his Third Reich by silencing political opposition, marginalizing, then exterminating the German Jewish and “deviant” populations, and finally by subjugating the Western democracies and the communist Soviet Union.
The Wehrmacht‘s carefully orchestrated surprise-attack on Poland (recreated by the Treaty of Versailles) on September 1, 1939 precipitated the European phase of WWII. After the British and French governments’ subsequent declarations of war with Germany, they were unwilling to take any military measures against the Reich. The French were content to man their Maginot Line of expensive forts along the border with Germany and wait for events. While the British were initially able to deploy four divisions on the Continent, they were not allowed to take up forward defensive positions in Belgium because of King Leopold’s adamant insistence on maintaining his country’s neutrality, even in the face of Hitler’s obviously aggressive intentions.
Unhindered, the Wehrmacht overran Poland in three weeks, aided at the end by the Red Army that attacked the Poles from the east on September 17 in accord with Stalin’s secret pact with Hitler.
What now ensued over the next seven months was a state of suspended hostilities the French dubbed the “drôle de guerre” and much of the English-speaking world referred to as the “phony war.”
“Phony” it may have been in the west, but in Scandinavia it was anything but. Stalin, wanting to improve the USSR’s strategic position and emboldened by his seizure of eastern Poland, ordered an attack on Finland in November. The Finns fought back tenaciously in the “Winter War,” but ultimately gave up the unequal contest the following March.
Nor was there a phony war fought over Norway in the spring of 1940. Both the British and German forces sought to occupy the country, the British to interdict and the Germans to protect the movement of Swedish iron ore that fed the Nazi armament factories. The Wehrmacht was quicker; in a combined sea and airborne assault in early April it seized the major Norwegian cities and ports (and overran Denmark for good measure). The Norwegians and British fought back tenaciously, but were ultimately no match for the Germans. The battle for Norway was still underway when Hitler opened his real campaign against the western democracies a month later.
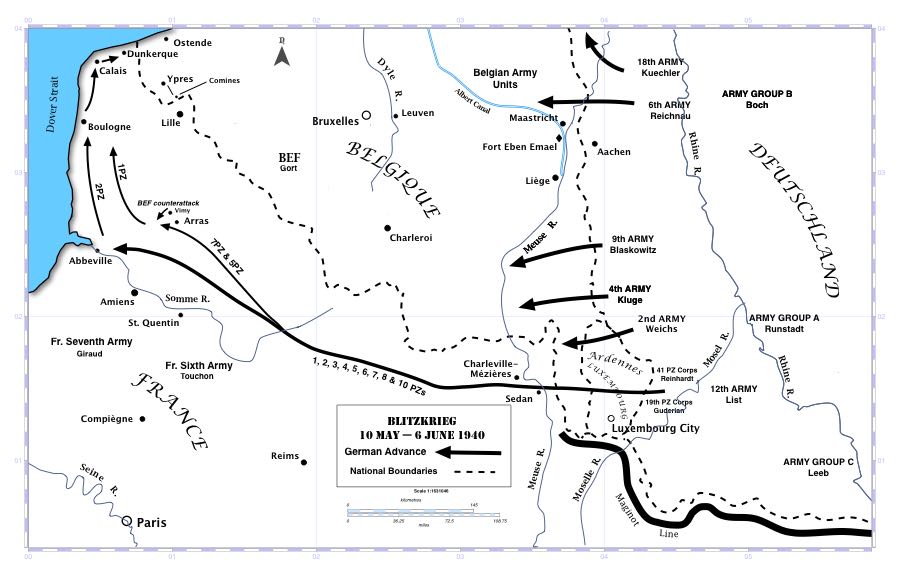
Meanwhile, behind the seeming inactivity along the French, Belgian, Dutch borders with Germany, both the German and Allied High Commands were feverishly working on their war plans. Fall Gelb (Case Yellow), as the Wehrmacht plan was named, called for an end run around the Maginot Line with its Panzer Divisions (mechanized units led by tanks) racing across the Belgian plain into northern France. It resembled a motorized reprisal of the Schlieffen Plan that the German Empire had implemented against France and Belgium in 1914.
Unfortunately for the Wehrmacht General Staff (OKW), it was exactly the move the French expected. To counter, the French High Command, now led by Gen. Maurice Gamelin, came up with Plan D, which called for the movement of French First Army Group (with the BEF on its left flank) into neutral Belgium to take up defensive positions behind the Dyle River. The Dyle formed a natural barrier that ran in a north/south direction through Louvain about 30 km east of Brussels. The French 7th Army was also expected to race north across Belgium to aid the Dutch.
Hitler planned to strike early in 1940, but adverse weather forced multiple postponements, and then disaster struck. Running out of fuel, an airplane carrying a junior staff officer with a set of Fall Gelb plans, lost over the German/Belgium border, landed in Belgium. Despite frantic efforts by Maj. Helmuth Reinberger to burn the top-secret documents, Belgian border guards recovered most of them intact. For the Allies, the question was whether this seeming windfall was just that or a clever German ruse. For the OKW, the question became whether to press on with their original plan once they knew it had been compromised.
The uncertainty actually played into the hands of a number of German officers who were unhappy with the unimaginative nature of Fall Gelb, chief among them Gen. Erich von Manstein, Chief of Staff of Army Group A and Gen. Heinz Guderian, the leading German proponent of mobile, armored warfare. At the conclusion a formal dinner with Hitler, Manstein was able to present his plan for the Führer’s consideration. Hitler, himself unhappy with the original Fall Gelb, bought into it immediately. What Manstein proposed was that the bulk of the Wehrmacht’s panzer divisions, along with associated motorized infantry and artillery units, be grouped together in Gen. Gerd von Rundstedt’s Army Group A for a drive through the Ardennes Forest in Luxembourg, across the Meuse River, and then launch a scything sweep across northern France to the Channel, cutting off the British, French and Belgian Armies rushing north to defend the Dyle River line.
Most military planners insisted that the road net in the hilly, heavily wooded Ardennes could never support a motorized attack of that magnitude. French planners were especially numerous among the doubters, thus the Franco/Luxemburg border was only lightly defended. So you can imagine their surprise and dismay when they realized that the spearheads of seven panzer divisions (with some 1,800 of the 2,400 available tanks) were crossing the Meuse in assault boats and over pontoon bridges on May 13, only three days after the Wehrmacht unleashed its blitzkrieg.
The BEF (now beefed up to ten divisions) and the French 1st Army had responded quickly to the long expected attack by moving east to take up their pre-assigned defensive positions. The tough, little Belgian army was arrayed to their north. The Netherlands was left to fend for itself when Gamelin recalled his 7th Army shortly after the bombing of Rotterdam on May 14 causing the overwhelmed Dutch Army to surrender.
The Meuse crossing precipitated the first tank battle of the campaign, when French armored units attacked, but General Charles De Gaulle’s dispersed Char Bs proved to be no match for the Panzer IVs that represented the state-of-the-art tank in 1940. (With upgraded armor and a larger gun, the workhorse Panzer IV clanked on to the war’s end. Over 8,000 were built, although fewer than 300 were available in May 1940.) Panzer Is and IIs were little more than tracked armored cars mounting machineguns, and the IIIs were lightly armored and gunned.
The battle in the air also had gone poorly for the Allies with the RAF quickly losing over half the Fairey Battles and other semi-obsolescent aircraft it had committed to the defense of France and Belgium. Soon thereafter, Churchill would refuse French requests to send more Hawker Hurricane fighter squadrons to France because his gut told him that the battle for France was lost and those fighters (along with the newer, faster Supermarine Spitfires) would be desperately needed for the defense of the British Isles. During the actual evacuation in late May and early June, the fight for air supremacy turned against the Luftwaffe, as its aircraft were entering combat at their extreme tactical range allowing the RAF’s Spitfires, operating from bases in southeast England, to gain control of the sky over the evacuation beaches at critical times.
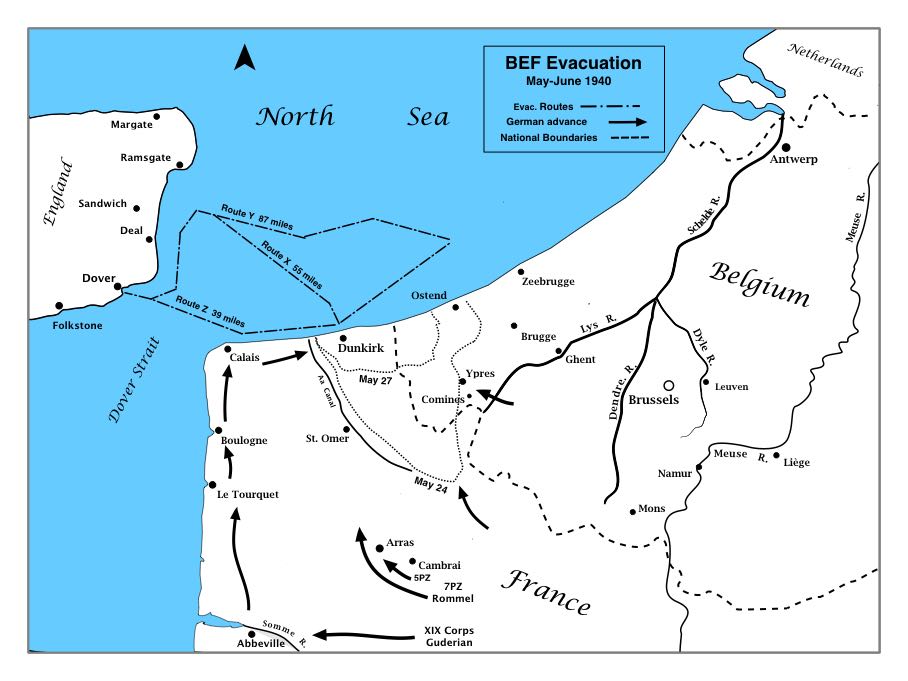
Over the next ten days, the BEF was not so much defeated as it was left exposed on its flanks by the collapse of the French and Belgian Armies. As it retreated in the face of unrelenting German pressure from elements of Army Group B, the least motorized of the main German armies, individual units began to disintegrate, but not so much that the BEF couldn’t mount a counterattack against Gen. Erwin Rommel’s 7th Panzer Division south of Arras on May 21, or fight a desperate holding action later along the Ypres-Comines Canal. Those battles, however, could only temporarily delay the onrushing Germans, but it was enough to allow the BEF to form an escape corridor leading to Dunkirk.
Guderian’s panzers divisions reached the estuary of the Somme at Abbeville on May 21 as well, effectively cutting off the northern Allied armies.
By then, General Lord Gort (John Vereker), the affable and unflappable commander of the BEF, had already raised the idea of an evacuation of his command, only to be sternly rebuked by Whitehall. But now, rejecting the idea of launching a counterattack to the south against Guderian being urged by his superiors in London and Paris, he began to plan an evacuation of the BEF from the port of Dunkirk, as Guderian’s panzers advancing up the coast were already threatening Boulogne and Calais.
At this moment, in one of his greatest military blunders during the Second World War, Adolf Hitler ordered his tank columns to halt at the Aa Canal, just twelve miles southwest of Dunkirk. His air chief, Field Marshal Hermann Göring, had assured him that the Luftwaffe could finish the job of rounding up the BEF, and by the time that effort had failed and the order cancelled, most of the BEF and many French troops had been evacuated. Churchill was adamant that the poilus be rescued along with the Tommies.
All the while, deep in a tunnel bored into the chalk cliff under Dover Castle, Adm. Bertram Ramsay, recently recalled from a forced retirement, was planning the naval side of that withdrawal by commandeering every suitable vessel he could find, even requisitioning 40 barges (”skoots” that had recently slipped out of Dutch harbors) along with assorted eel boats, trawlers, coasters and even a hopper dredge. Operation Dynamo, as Ramsay’s enterprise was named because of the unused “dynamo room” that served as his command-center, would eventually employ Royal Navy destroyers and smaller vessels alongside civilian craft down to the size of small fishing and pleasure boats to rescue the stranded soldiers.
The evacuations began in earnest on May 27, with the smaller boats moving inshore to load soldiers who had waded out into the shallow water and from moles and make-shift jetties. The rescued soldiers were then transferred to larger vessels that carried them farther out to the actual ships (often Royal Navy destroyers) that then ferried them across the Channel. During the night of the 29th, around 400 smaller craft were towed to Dunkirk in long lines to help speed the evacuation.
Neptune was with the British as usual (think of the Spanish Armada, Trafalgar and Jutland). The Channel, often beset this time of year with rough weather and a vicious chop, remained placid during most of the evacuation. The calm allowed the smoke from burning oil tanks in Dunkirk to obscure the mole where larger ships could tie up, enabling them to board the troops directly. Even so, attacks from the sea by German U-boats and Schnellboote (fast motor-torpedo boats), along with the bombing and strafing by Gen. Albert Kesselring’s Luftwaffe in its all-out attacks on May 27, 29 and June 1 (poor weather kept the Luftwaffe grounded on the other days) took their toll of both ships and evacuees. Six RN destroyers were sunk during the evacuation. In the final tally, 243 of the 861 vessels of all types participating in the evacuation were lost. So dangerous was the work that some boat crews refused to return to the beaches after multiple crossings.
The last BEF staff members were taken off the beach around 2:00 a.m. on June 4; the first soldaten entered the town later that morning to accept the French surrender. German photographs show a ruined town littered with burned out vehicles and dead soldiers.
The official tally came to 338,226 British soldiers rescued, along with another 123,000 Frenchmen most of whom were quickly shipped back to unoccupied France to continue the fight.
Both sides claimed victory. One Nazi magazine called it “the greatest battle of annihilation in history,” an obvious misreading of what had actually occurred. The British were merely grateful for the seemingly miraculous escape of their army.
Other sizeable BEF units, cut off from the main body by Guderian’s drive to the Channel, were later evacuated through the Normandy port of Cherbourg and elsewhere.
The French fought on until their new government under WWI hero, Marshal Philippe Pétain requested an armistice on June 18. Some French troops escaped to North Africa, others across the Channel to the United Kingdom.
The British Army’s subsequent recovery was almost as dramatic as its rescue. Despite abandoning its weapons and rolling stock during its retreat, the Army was reequipped and reconstituted in short order, this effort being greatly aided by the decidedly un-neutral military aid from the United States in line with the Roosevelt Administration’s pro-British stance.
Almost as amazing as the evacuation itself was the warm reception the weary, dispirited soldiers received in England where the people treated them as returning heroes rather than as the defeated army they actually were.
Churchill warned against undue optimism and was personally pessimistic, yet his speeches to the House of Commons during the crisis in France are his most stirring and dramatic: “I would say to the House,” he spoke on May 13 just after he organized his “Grand Coalition” government, “as I have said to those who have joined this Government, ‘I have nothing to offer but blood, toil, tears and sweat.’ . . . Victory at all costs, victory in spite of all terror, victory however long and hard the road may be; for without victory there is no survival.”
Or, on June 4, “ … we shall not flag or fail. We shall go on to the end. We shall fight in France, we shall fight on the seas and oceans, we shall fight with growing confidence and growing strength in the air, we shall defend our island, whatever the cost may be, we shall fight on the beaches, we shall fight on the landing grounds, we shall fight in the fields and in the streets, we shall fight in the hills; we shall never surrender, and if, which I do not for a moment believe, this island or a large part of it were subjugated and starving, then our empire beyond the seas, armed and guarded by the British Fleet, would carry on the struggle, until, in God’s good time, the New World, with all its power and might, steps forth to the rescue and liberation of the Old.”
And then on June 18, the day France fell, “Let us therefore brace ourselves to do our duty and so bear ourselves that if the British Commonwealth and Empire lasts for a thousand years men will still say, ‘This was their finest hour.’”
Heartened by Churchill’s words and the rescue of the BEF, his countrymen and women responded magnificently in defense of their island kingdom.
And now, if we may be permitted a worn cliché, “the rest is History.”
Three sites are imminently worth visiting for those still curious about the Dunkirk evacuation.
Foremost, of course, is the port of Dunkirk itself and its “Musée Dunkerque 1940 Operation Dynamo” located in the 19th century fort used by the Allied commanders during the evacuation. The museum is closed until mid-July 2017 for an expansion that will double its exhibition space. Address: Courtines du Bastion 32, rue des Chantiers de France, Dunkerque. Traditionally it has been open from April to September, 10 a.m. to 12 p.m. and 2:00 p.m. to 5 p.m. Admission charged. Website: www.dynamo-dunkerque.com. Phone: +30 (0)3 28 66 7921.
Dunkirk is also home to two other excellent museums: the Musée Portuaire, a maritime museum and a contemporary arts museum. Both are very much worth visiting while you are in Dunkirk.
Across the Channel stands the medieval Dover castle from where Adm. Ramsay directed Operation Dynamo. It is possible to visit the tunnels bored into the chalk cliffs where there are exhibits commemorating the evacuation. The Castle also features guided tours, a gift shop and a restaurant. A statue of Adm. Ramsay stands on the grounds. Address: Castle Hill, Dover, Kent, CT16 1HU. Open from March 29 through October 31, 10 a.m. – 6 p.m. daily. Open only weekends for the remainder of the year. Admission charged. Website: www.english-heritage.org/uk/visit/places/dovercastle. Phone: 01304 211 067.
While you are in London you must visit the Imperial War Museum’s permanent exhibit “Turning Points: 1934 – 1945.” In addition to its exhibits, the IWM holds extensive collections of artifacts, printed materials and photographs related to Operation Dynamo. This year, 2017, marks the centennial of the museum. Open every day except 24-26 December from 10 a.m. to 6 p.m. Free admission, except for special exhibits. Website: iwm.org.uk. Phone +44 (0)20 7416 5000.
There are a number of small boats that were part of the Dunkirk “miracle” that have survived. If you go to Flickr Photos and enter “Dunkirk evacuation,” you will turn up photographs and concise histories of a number of these craft, most notably MTB 102, RAF Rescue Launch HLS 102, Medway Queen and Sundowner. Another small boat involved in the evacuation is on display at the Imperial War Museum in London.
Every year on the anniversary of the evacuation, many small craft, including some of the actual survivors, make the crossing from Dover to Dunkirk to commemorate the “miracle of Dunkirk.”


